You can easily send your application logs to Retrace if you are using Serilog. Here's a summary of what you need to do:
- Add our NuGet packages Serilog.Sinks.Stackify and StackifyLib.AspNetCore
- Add our logging sink to your Serilog configuration
- Specify your Stackify license key in your configuration and let your app read the Stackify properties
- Log some events!
The code for Stackify's .NET library and logging appenders are all available on Github.
This guide is based on .NET 6 so the examples and code snippets are based on this version, unless otherwise specified. Your configuration might be different if you're using an older runtime such as .NET Framework 4.8 or below, or .NET Core 3.1 or below.
1. Getting Started Using NuGet
Install our NuGet packages to your app:
PM> Install-Package  Serilog.Sinks.Stackify
PM> Install-Package  StackifyLib.AspNetCore
2. Add the Stackify properties to your app config
In particular, the following properties are needed to send logs to Retrace:
- API key (or activation key)
- AppName
- Environment
Forgot your API key? Head over to https://s1.stackify.com/Onboarding/InstallGuide/InstallRetrace to fetch it (or generate a new one of needed).
The API key authenticates the logs being sent to your account. While the AppName and Environment properties are used to identify the logs in Retrace. The logs will show up under a monitored app in Retrace if those 2 properties match; otherwise, if it does not match an existing app, the logs will still be reported but may only appear under the Global Logs search page.
.NET 6 appsettings.json:
{
   /* ...other properties... */
   "Stackify": {
       "ApiKey": "Your-API-Key",
       "AppName": "You-App-Name",
       "Environment": "Your-Env"
   },
   /* ...other properties... */
}
.NET Framework <=4.8 web.config
<appSettings>
    <add key="Stackify.ApiKey" value="Your Activation Key"/>
    <add key="Stackify.AppName" value="Your App Name"/>
    <add key="Stackify.Environment" value="Your Environment"/>
</appSettings>
3. Configure Serilog to use Stackify
Below is the simplest Serilog configuration needed to log to Retrace.
Log.Logger = new LoggerConfiguration()
                .WriteTo.Stackify()
                .CreateLogger();
Also, add this line to your Program.cs file:
app.ConfigureStackifyLogging(app.Configuration);
By the end of this step, you should have a similar configuration in your Program.cs file:
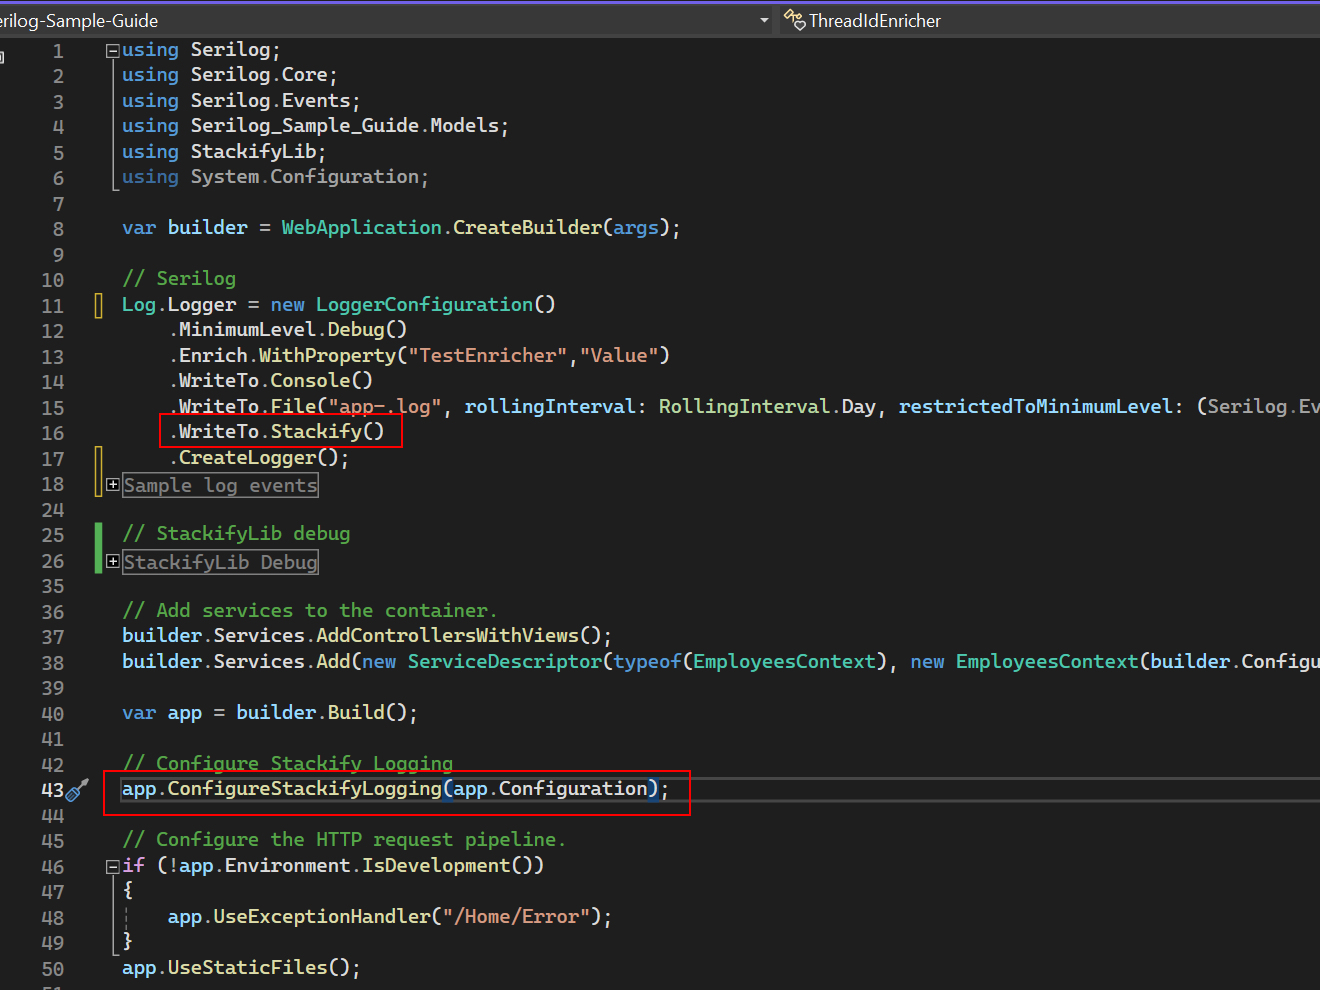
In the image, we see multiple sinks, i.e. logging output targets, conifgured for Serilog. Your file might also have fewer lines compared to the image (or even more), what's important here are the boxed lines.
The configuration should be pretty much done at this point. All that's left is to add the actual log events.
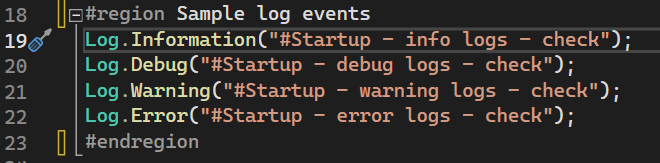
4. Log something!
Here are sample logs you can add to your code:
Log.Debug("Something for debugging purposes");
Log.Information("Here's an informative entry, no need to take action");
Log.Warning("Something might be up and may blow up");
Log.Error("Ooops - something definitely went wrong.");
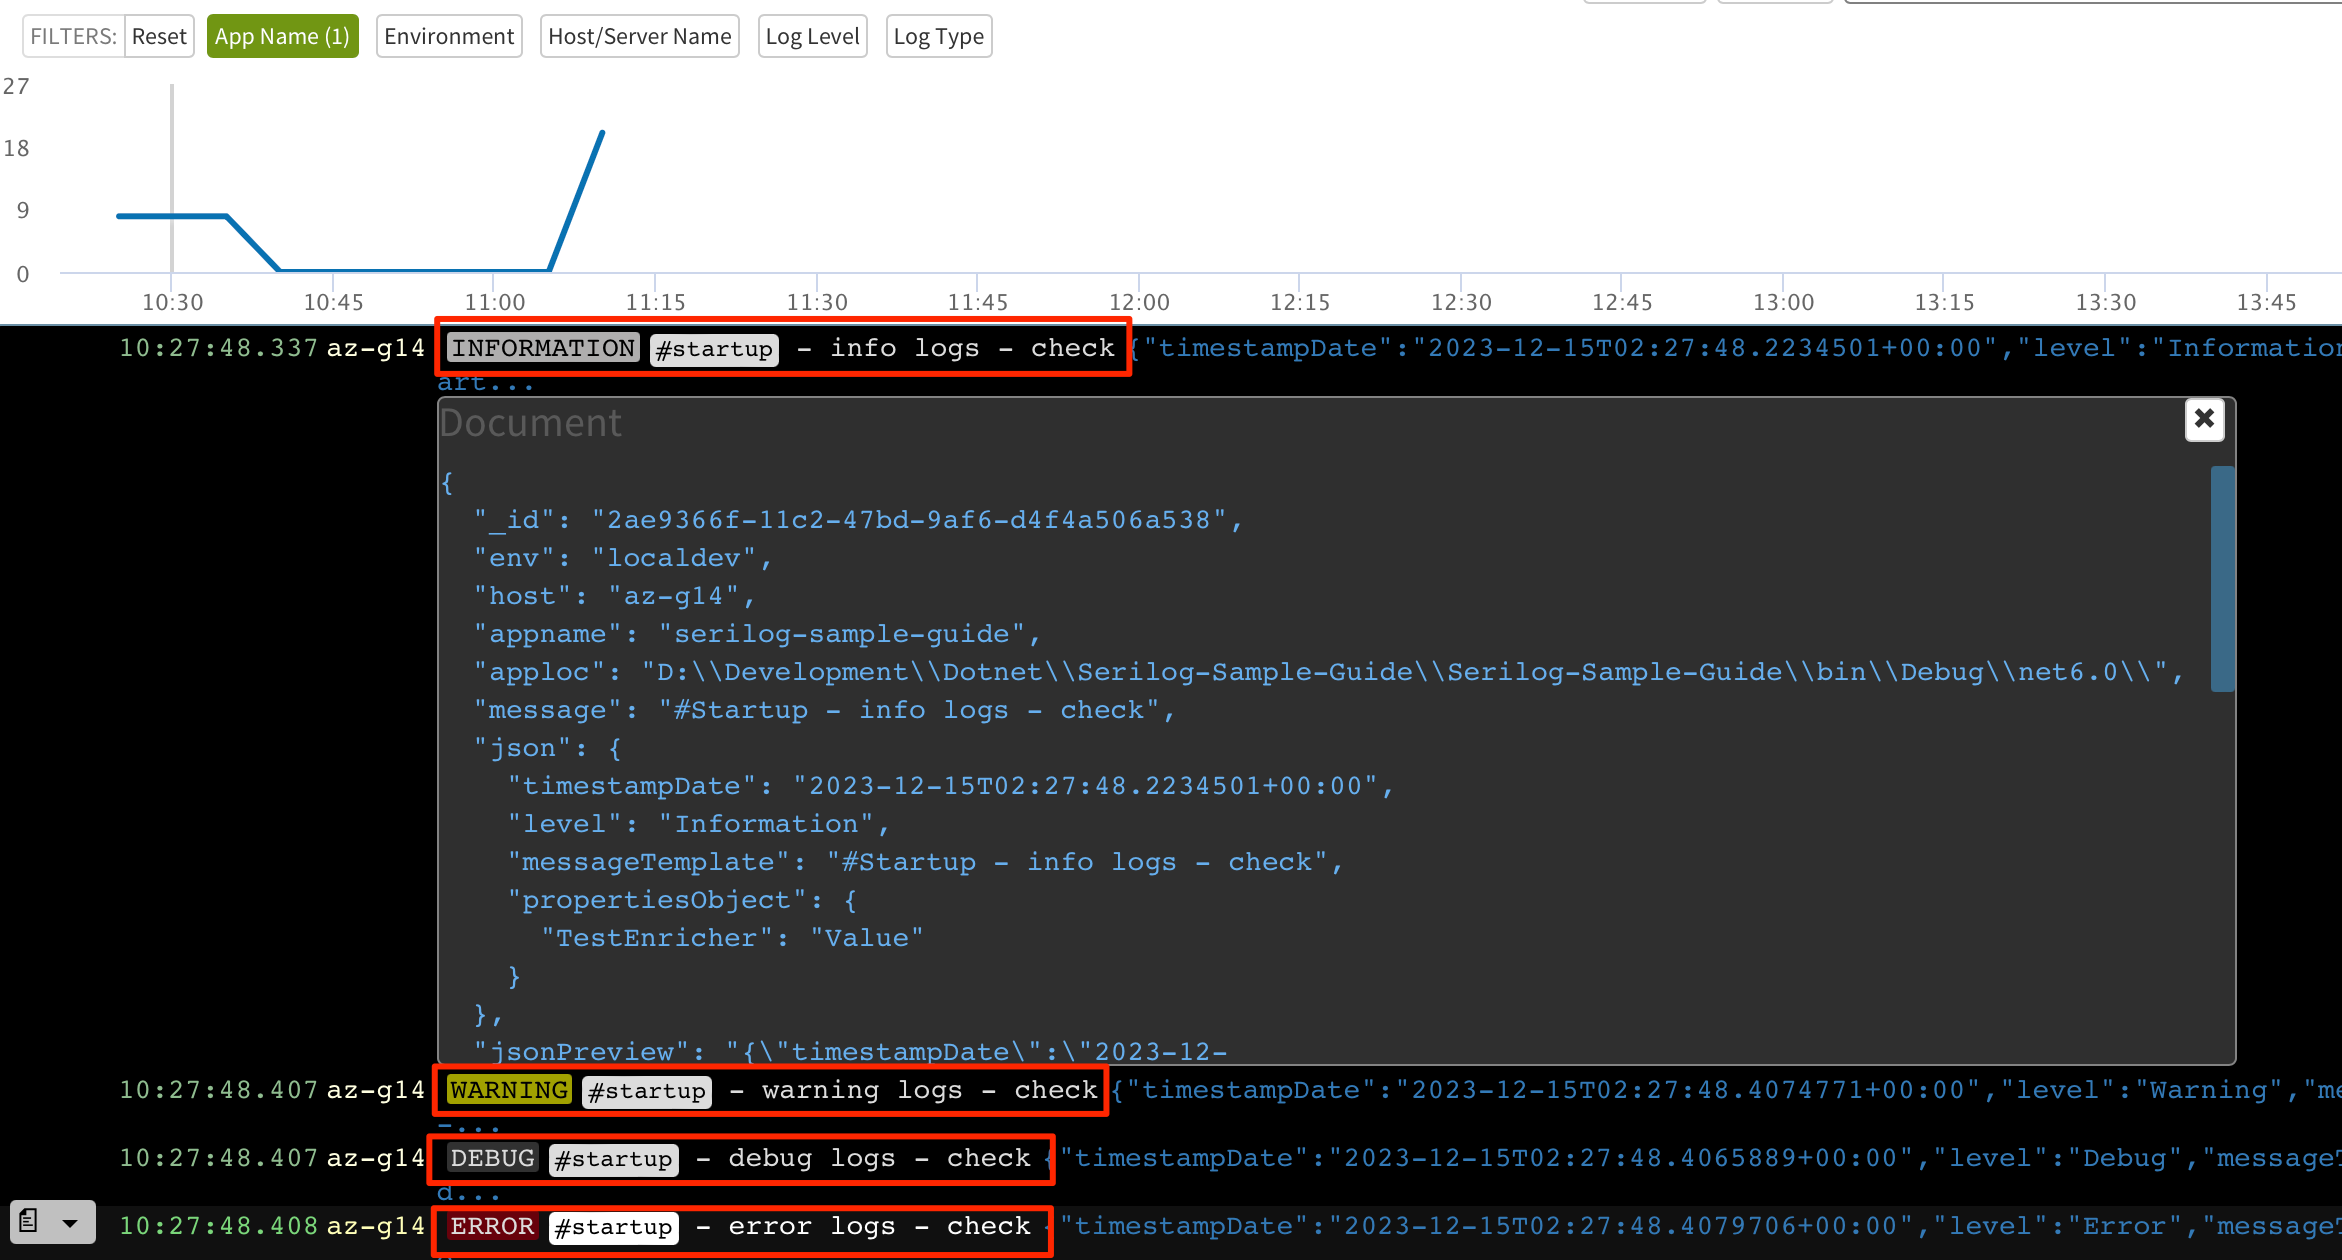
For example:
And here's how the logs would appear in Retrace:
Not seeing any logs? Head over to our troubleshooting guide to find out why: https://docs.stackify.com/docs/troubleshoot-errors-and-logs-net-configurations
Miscellaneous
Retrace also supports other Serilog features such as enrichers, log level filtering, log/event-specific context properties, and so much more. You can find examples for some of them in the succeeding sections.
Check out Serilog's GitHub page for more details about all available features.
Custom Log Properties Using Enrichers/Contextual Values
- .Enrich.WithProperty() - Using this option allows you to add a pre-defined property to your log events, which can be quite useful if you want to include constant variables/properties from your app to all logging events.
Log.Logger = new LoggerConfiguration()
                .Enrich.WithProperty("ConstantProperty","Value")
                .WriteTo.Stackify()
                .CreateLogger();
This example will add the key-value property of "ConstantProperty":"Value" in every log event. This is the result in Retrace:
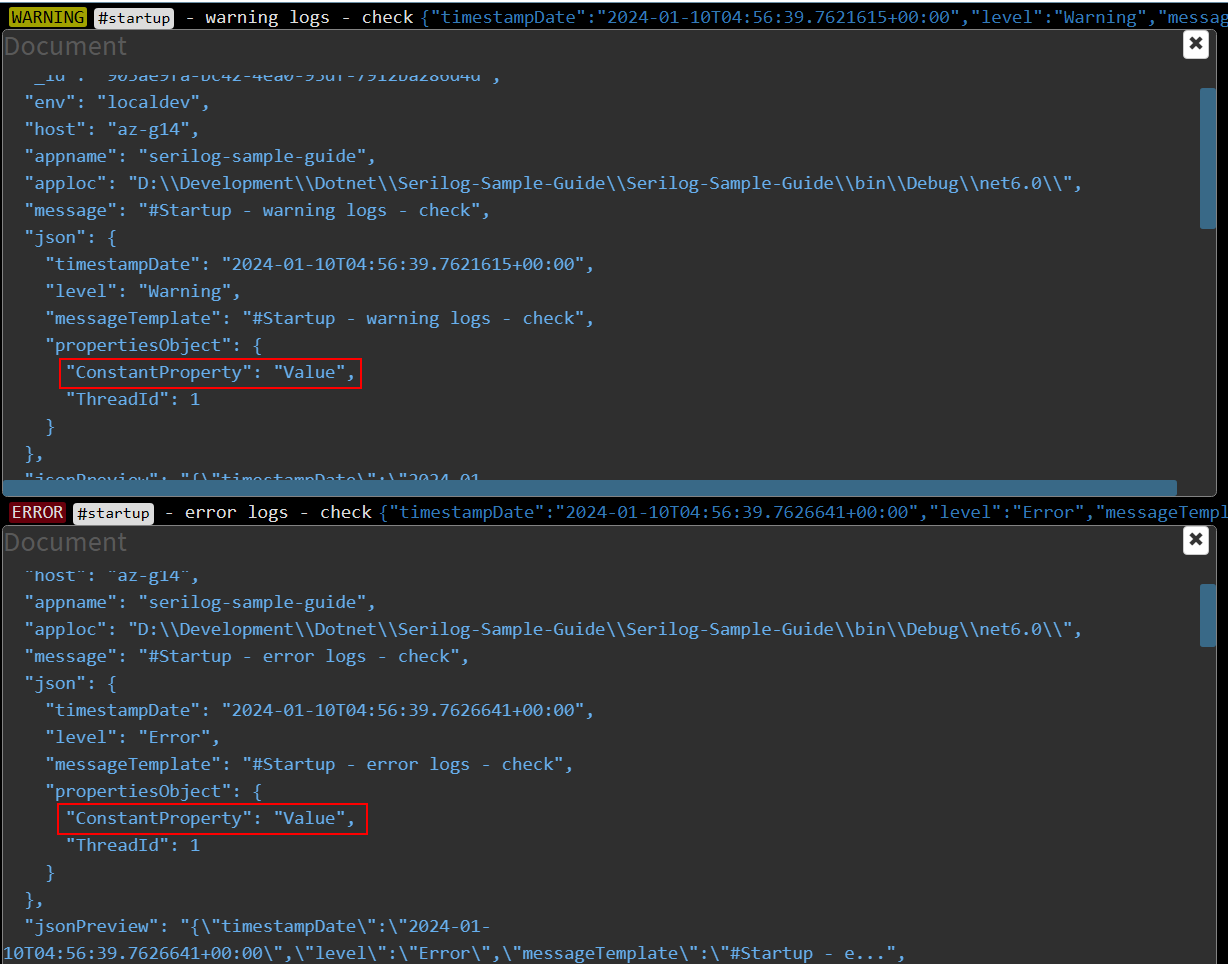
Notice how two different logging events have the same property.
- .Enrich.With() - This is useful for adding dynamic values to your log events. You have to first override the Enrich() method to include the property you wish to add. The following snippet is an example that adds a ThreadId property to all logs:
class ThreadIdEnricher : ILogEventEnricher
{
    public void Enrich(LogEvent logEvent, ILogEventPropertyFactory propertyFactory)
    {
        logEvent.AddPropertyIfAbsent(propertyFactory.CreateProperty(
                "ThreadId", Thread.CurrentThread.ManagedThreadId));
    }
}
For simplicity (and just to test this out), you may add the snippet above as an additional class in the same file you are adding the Serilog configuration, such as in Program.cs of your app (based on .NET 6).
Then, your Serilog configuration will look like the following:
Log.Logger = new LoggerConfiguration()
                .Enrich.WithProperty("ConstantProperty","Value")
                .Enrich.With(new ThreadIdEnricher())
                .WriteTo.Stackify()
                .CreateLogger();
Check out the previous image to see how this is reflected in Retrace, you'll see a property named "ThreadId".
- .ForContext() - You can also add event-specific properties using this method. The properties will only be available in the log events where you define this.
For example (and given you have already configured Serilog somewhere in your app), here's a log event that logs a debug event saying "Custom properties from home" with its own additional property of "ID":20230423.
Log.ForContext("ID", 20230423).Debug("Custom properties from home");
Here's how this appears in Retrace:

Notice the "ID" property is only seen in the debug log and not in the previous event.
Control Which Logs are Sent to Stackify
If you send your logs to multiple places and want to change what goes where, you can do that, even without creating a seperate logger object. All you need to do is add multiple write methods to the logger when it's created, and restrict their minimum logging level, as shown below.
var stackifyLogger = new LoggerConfiguration()
                .WriteTo.Stackify(restrictedToMinimumLevel: LogEventLevel.Debug)
                .WriteTo.File("errorlogs.txt", restrictedToMinimumLevel: LogEventLevel.Error)
                .CreateLogger();
In this example, the logs from the same logger object are being writen to both Stackify and to a local file. Stackify will receive everything while the text file will only contain logs error level and above.
View Your Logs With Prefix
You can use Prefix to view your logs on your workstation. It requires adding the Serilog appender to pick up and show your logs within Prefix. You don't even need to configure a Stackify ApiKey for Prefix to work properly!
Troubleshooting
If you are having issues getting Errors and Logs to come into your account, please see Troubleshoot: Errors and Logs .NET Configurations